
My Favorite Tools and Adhesives for Mixed Media Collage Art
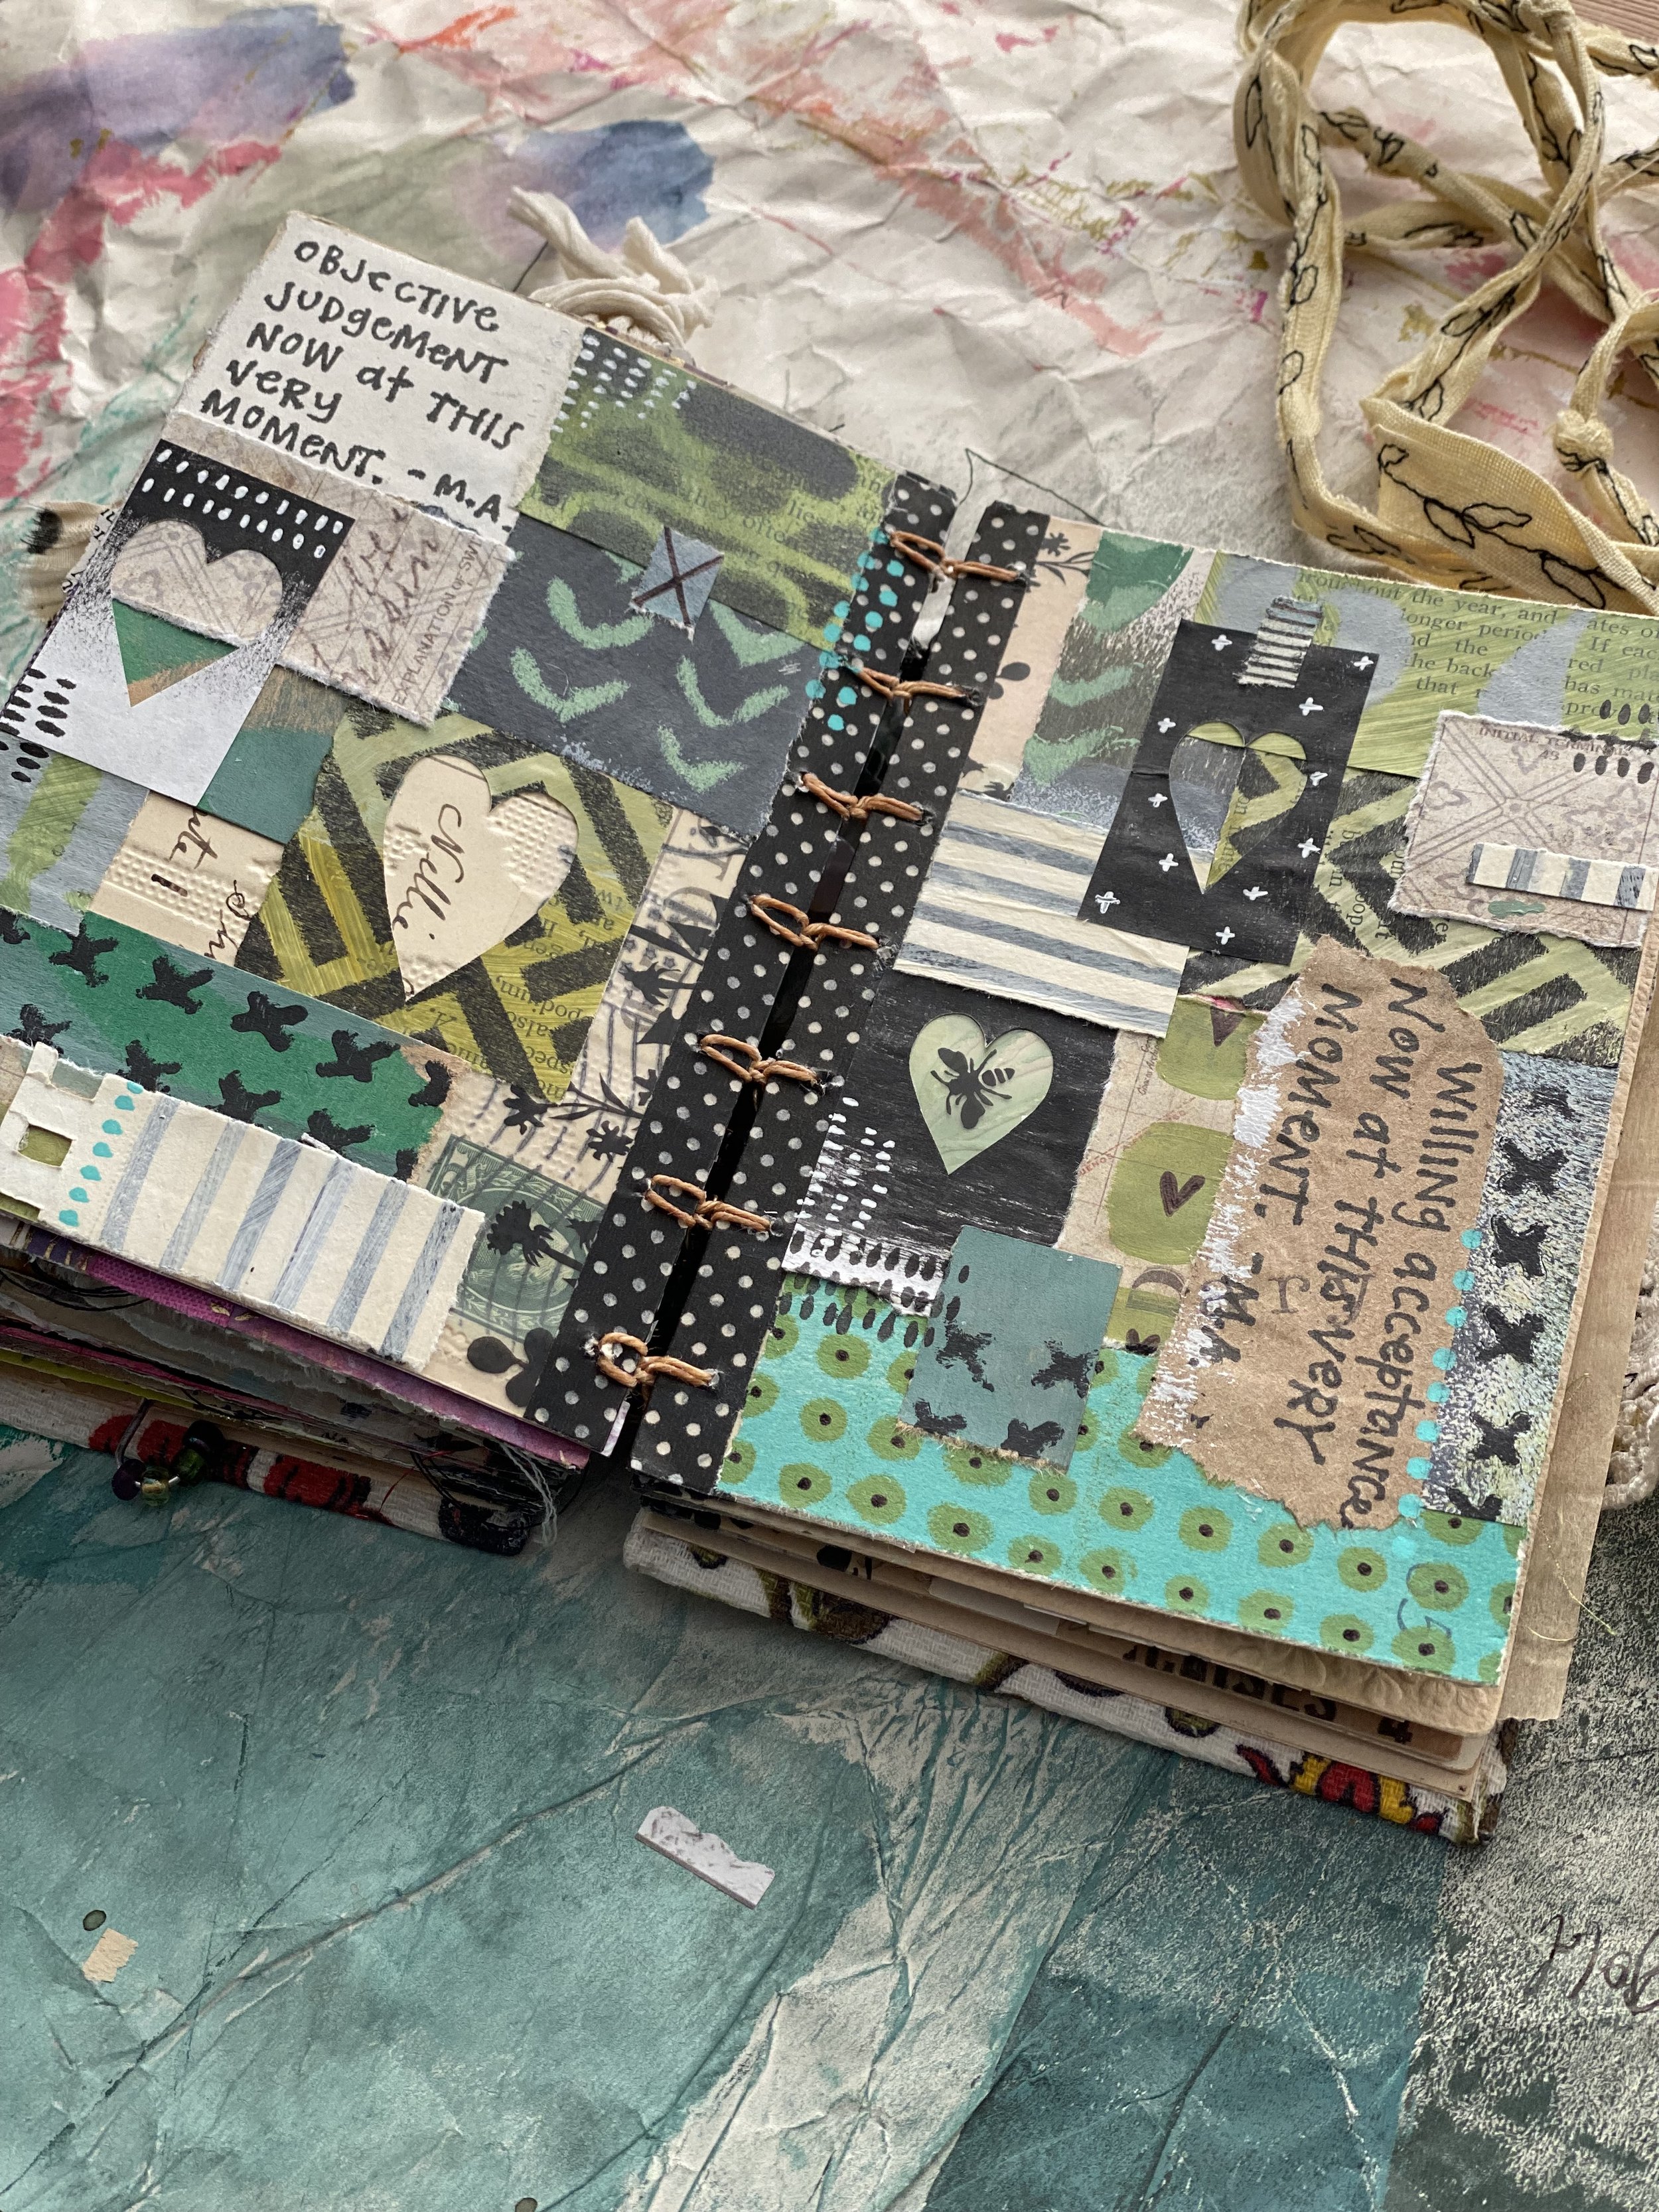
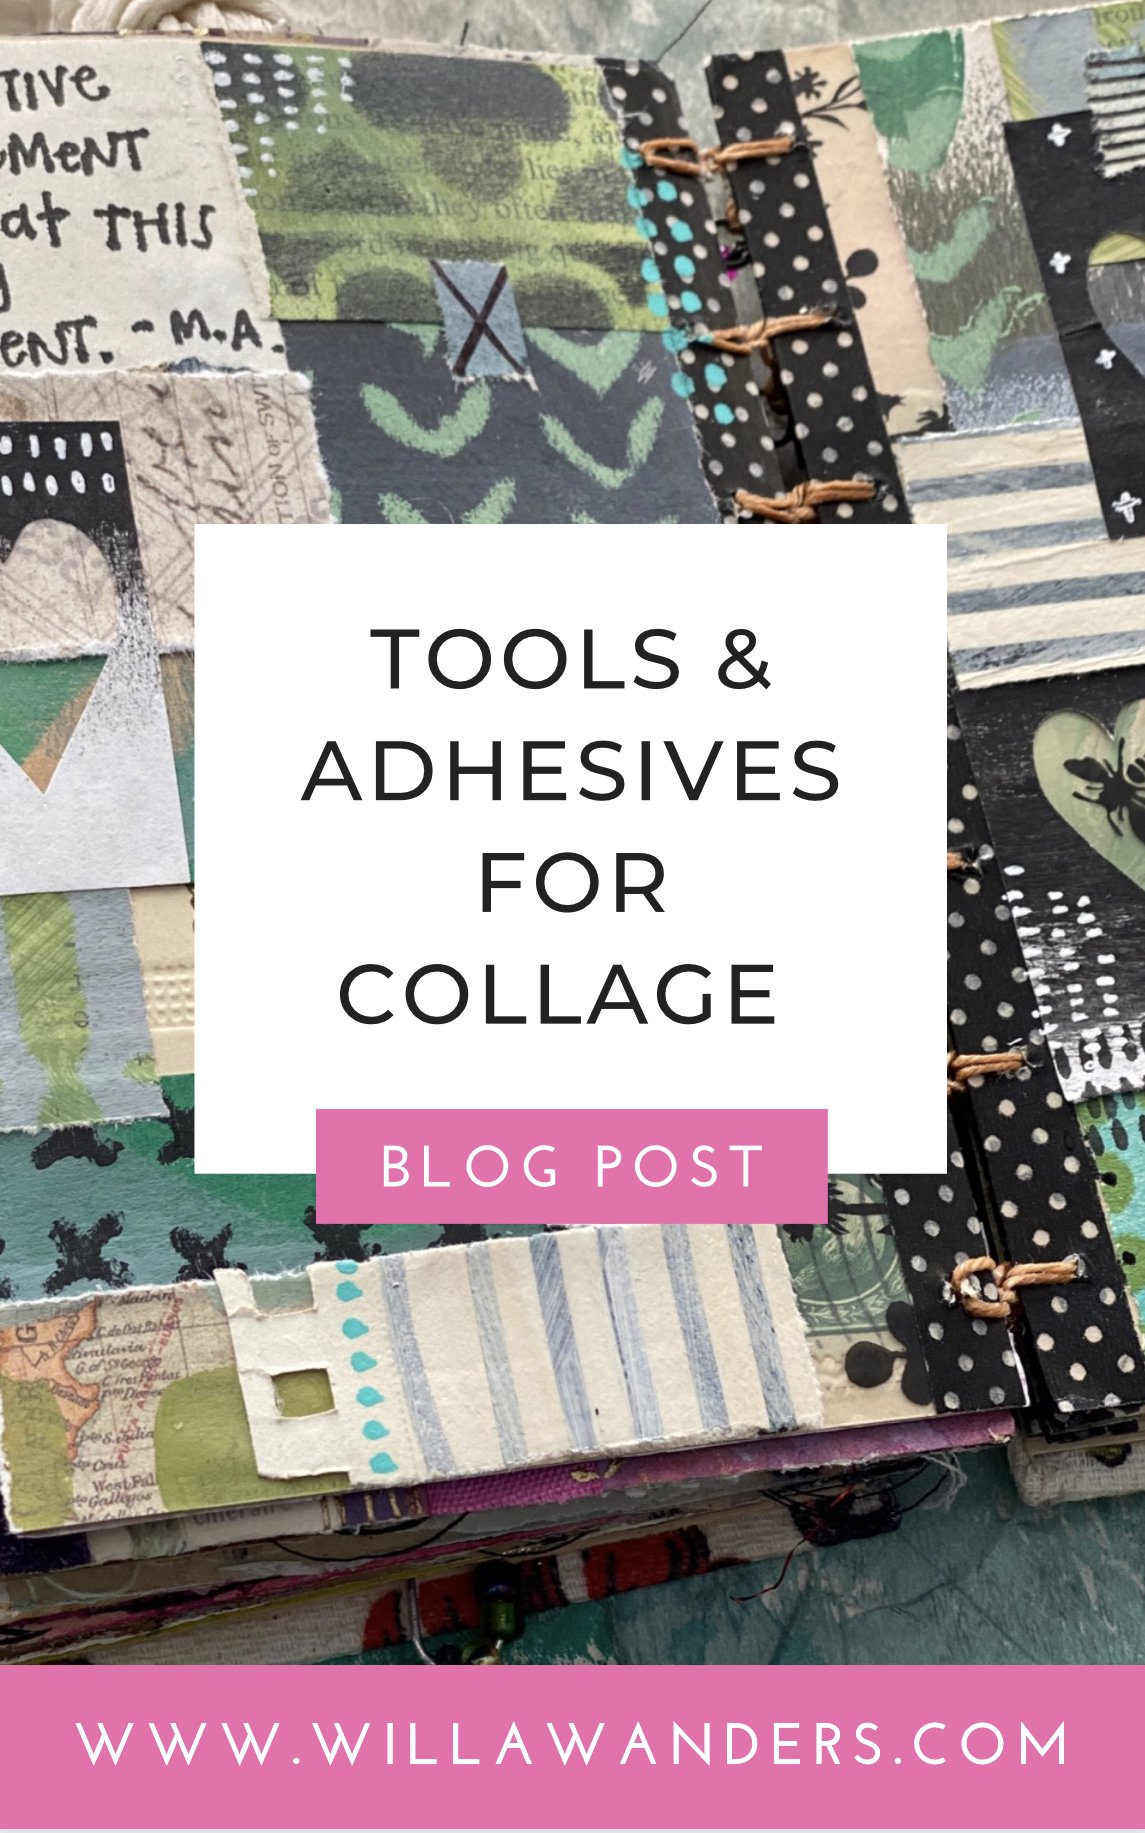
Pages from Tina Walker’s very special travelling journal.
This blog post is a complete round up of adhesives and tools that I have found indispensable in my mixed media collage, handmade book and art journaling practice. If you have something that you cannot live without, please leave a comment to this post and let us know the details.
Here is a list of the items that I consider essential, in no particular order. I will go over each item, why I chose it and exactly what brand I’m loyal to if there is one.
Here are all of the things that as a mixed media collage artist and art journaler I wouldn’t want to live without:
good quality paper scissors, one regular/large pair and one small pair for fussy cutting
high quality glue sticks
a rubber brayer
fluid matte medium
an inexpensive flat paintbrush, not too large, dedicated for use with fluid matte medium
PVA glue in a squeeze bottle with a metal tip
tweezers
old credit cards
Artist-tac by Grafix
heavy gel medium
a quality palette knife
2025 update: For a comprehensive roundup of all my favorite adhesives, check out this YouTube video I made recently!
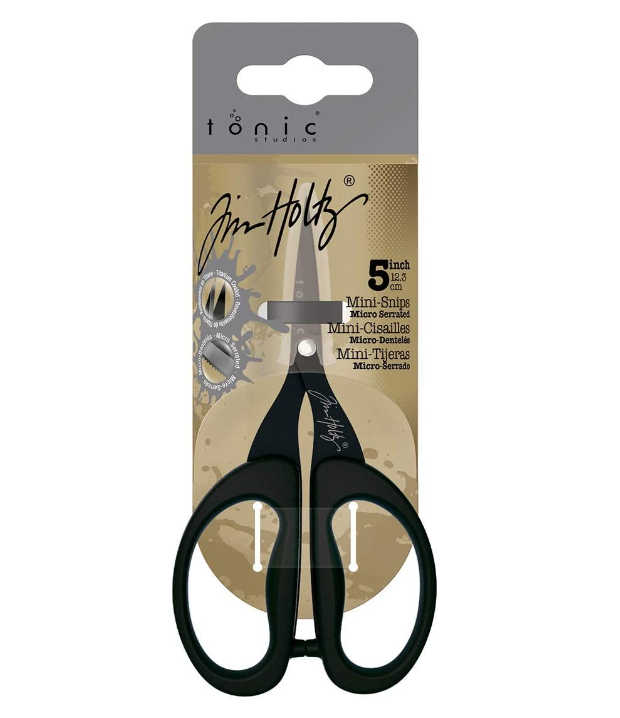
Number 1: Scissors.
I recommend that you have at least two dedicated pairs of paper scissors.
I have fallen madly, deeply in love with the Tim Holtz non-stick, micro serrated, titanium scissors with the soft cushioned handles. I own the large pair (9.5 inch) and the Mini Snips (5 inch). The minis are incredible for fussy cutting, which, whether you enjoy it or not, is a big part of mixed media art. And the large ones are just fun for all of your larger cutting needs because the blades are extra long and simply easier to cut a straight line with. Whatever scissors you are currently cutting with, I can almost guarantee that that the Tim Holtz scissors are better.
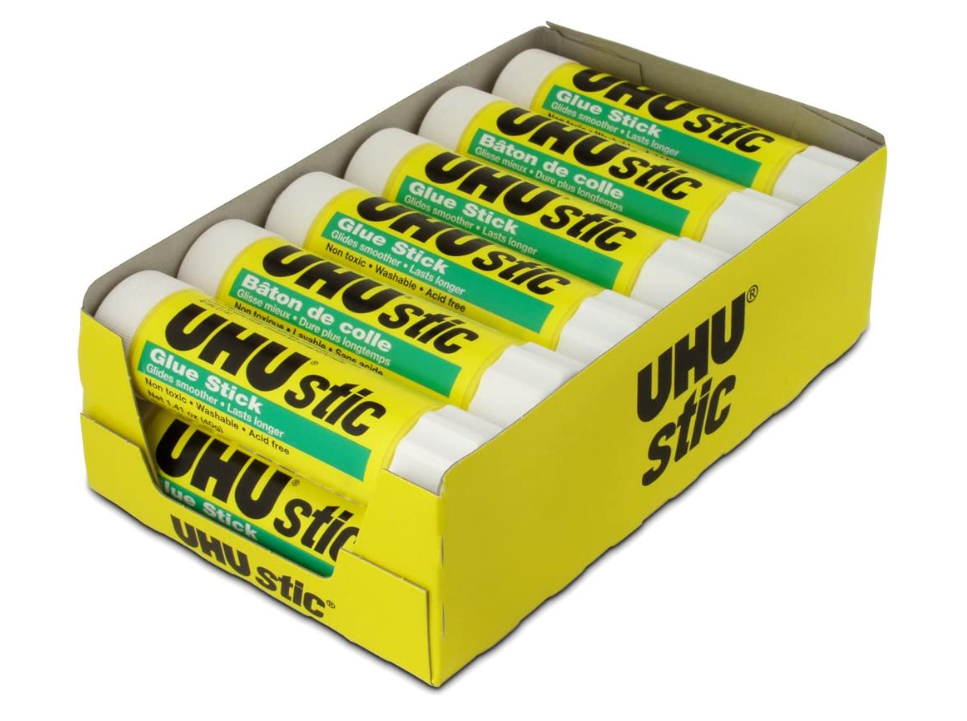
Number 2: High Quality Glue Sticks
Don’t mess around with brands or versions of glue sticks that are not high quality, aka school glue sticks. These glues are temporary and while you will be able to use them for collage, the paper will not be permanently adhered and you just might end up regretting that.
I have had great success with the glue sticks from UHU, and I know there are other great brands out there, I just haven’t tried them. I purchase glue sticks in the larger size and in bulk, that’s how much am gluing paper down! I estimate that I have been going through about two cases per year in a year of Fodder School. Of course, you don’t need to buy so many, unless you already know that you are crazy in love with Fodder School projects.

And here’s where that brayer comes in handy:
Number 3: A Rubber Brayer typically used for printing
When collaging paper to another surface, you’re going to need to rub something on top of that piece of collage fodder to make sure that all of your edges are stuck down, that there are no air bubbles or chunks of glue stick causing bumps.
Here’s where a soft rubber brayer is perfect (as long as the surface you are covering is a flat one!): just roll that brayer over your glued on collage fodder, pressing down as you go, and that paper is now perfectly adhered to the surface.
Alternatively, you can use an old credit card or your hands, but the brayer sure does the job better than either of those options.
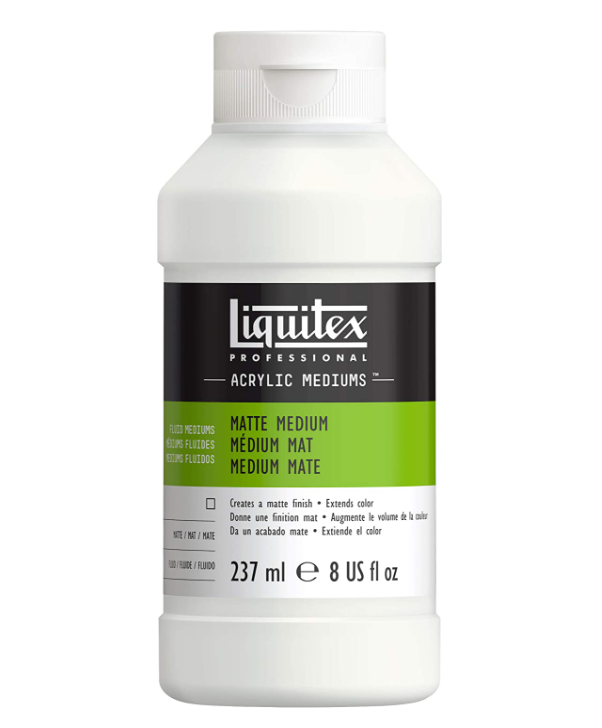
Number 4: Fluid Matte Medium
This is a wet glue that dries clear and with a matte finish. It is most useful when (1) you have a lot of gluing to do, (2) you have time to let your piece dry before moving onto the next step and (3) whatever you are gluing has waterproof/permanent color and won’t run all over the place if it gets wet or you just don’t care if the color moves.
When using fluid matte medium as your collage adhesive, you put both a layer under your collage fodder and on top of your collage fodder. Air bubbles can be pushed out with an old credit card as you work.
Why do people use matte medium when they could just use a glue stick?
Matte medium is faster, so people prefer it for large collage jobs like master sheet.
Applying matte medium with a cheap paintbrush or a scraper tool or old credit card eliminates your fingers from touching glue, and some folks just don’t like to deal with gluey fingers.
when dry, the final piece has a nice layer of matte medium on top of all of the collage fodder, so the paper is now protected from whatever else you are going to do to it.
Number 5: An Inexpensive, Flat Paint Brush
When using matte mediums, you’re going to need to have a dedicated paintbrush that you keep for just this purpose, as once the brush gets the gel medium in it’s bristles, it just ain’t gonna be the same again.
Look for a brush that has a flat shape (like a square or rectangle) and is of a medium size (not tiny, not huge). Don’t use a super cheap brush like a chip brush because the bristles will fall out into your glue and those brushes don’t have the control you’ll want for where and how much adhesive you want to apply.
If you don’t let the matte medium dry in the brush, and you rinse your paintbrush well with water after using, you’ll be able to use this dedicated brush for collage work for years.

Number 6: Reptile Glue
I have tried other popular PVA glues and this one is the clear winner to me. You may think that owning a glue stick and matte medium is enough to get you through any collage job, but I’m here to say that once you try Reptile Glue in a precision tip applicator bottle, your life will change.
When do I choose this glue? When I’m adhering fussy cut collage fodder pieces to something.
Reptile Glue is not runny and out of control like other glues I’ve tried that market themselves for this exact same purpose. It actually has the perfect consistency for easy squeezability plus perfect control.
A huge thank you to our September teacher in Fodder School 1, Kelly Anderson, for introducing me to this glue and the technique I’m going to talk about next.
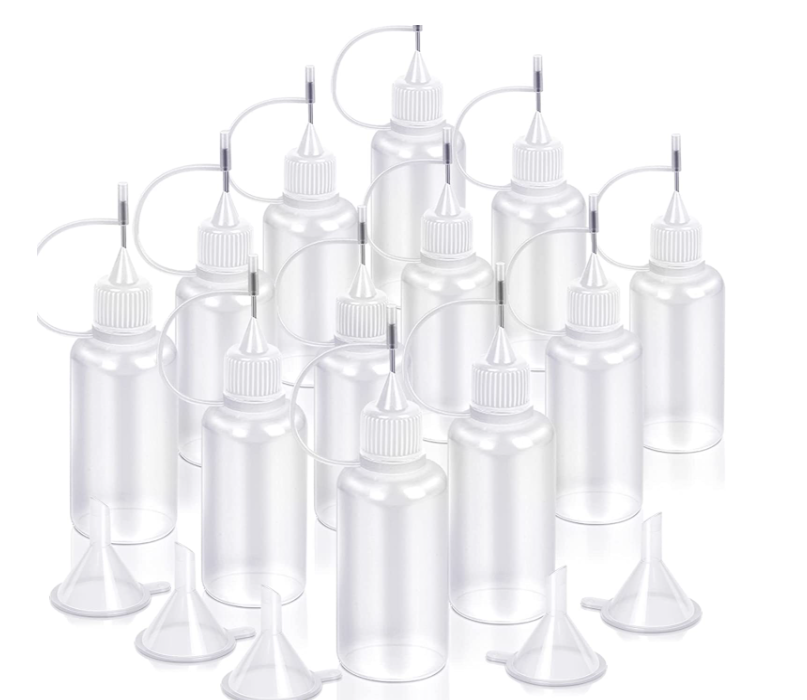
Number 7: Precision Tip Applicator Bottle
You’re going to want to transfer that Reptile Glue into a precision tip applicator bottle and then use the applicator bottle to apply the glue a precise and controlled way when gluing all of your fussy cut pieces to your art journal pages and mixed media projects. Just trust me on this. You can thank Kelly later.

Number 8: Craft Tweezers
The secret to clean hands when collaging is to use tweezers to pick up and handle your collage fodder. I had been collaging for years before using tweezer and I will never go back to using my hands, unless the fodder I’m applying is so large, heavy and floppy that it wouldn’t be possible to handle it with craft tweezers.
The difference between craft tweezers and the kind that you pluck your eyebrows with is the super pointy metal tips on the craft tweezers. Don’t try them on your eyebrows or you’re in danger of gouging out your eye. But you wouldn’t want any thing else for picking up small pieces of collage fodder with absolute ease and then applying those pieces exactly where you want them!
The absolute magic combination is tweezers + Reptile Glue + precision tip applicator bottle. Once again, thank Kelly!
Number 9: Old credit cards or plastic hotel room keys
These are just great all around tools for your arts and crafts tool kit and can be used when scraping adhesive under or over collage fodder, or to work out air bubbles.
OPTIONAL BUT RECOMMENDED
Number 10: Heavy Gel Medium
Sometimes nothing other than a heavy gel medium will get the job done because the piece you are applying is heavy or thick. A heavy gel medium will do the jobs that nothing else will, and it will do them easily and well. If you are unfamiliar with this product, it is an extremely thick paste that you apply to your object (evenly spread along the edge that you are gluing down) and then you simply press the piece onto your background and let dry. The heavy gel medium so is firm and sticky that the piece doesn’t move or slip or try to pop off.
Number 11: Grafix Artist-Tac
Artist-Tac is an adhesive that only goes where you want! It is made up of two protective liner sheets that pull apart to expose the double-sided micro adhesive dots. This super fine layer of dots are a quick, easy and economical replacement to traditional glue and adhesives. Perfect for when you want a quick application of glue to one side of a piece of collage fodder and you don’t want any drying time or mess.
Number 12: A Good Palette Knife
Palette knives are a great all purpse tool in any art studio, and one thing I love to use my palette knife for is tearing paper.
If I have folded and compressed my paper along an edge, all I need to do is to firmly hold the paper onto my table and run a palette knife on the inside edge. This creates a straight cut, but not a perfect clean edge. It is quick, and when I am doing a lot of straight cutting, it’s my preferred method to guarantee straight cuts. The fussy edge is a bonus as I prefer a grungier look to my art, as opposed to the totally clean line you would get from cutting with a scissors.
A high quality stainless steel palette knife with long, straight sides and a curved tip is what I prefer. Best to own one great palette knife rather than a big set of cheap ones.
Here are some great podcast episodes to listen to


